Friday, February 26, 2016

Week 3/ Sutures

Hi Everyone,

In today’s post, I will start off by covering some basic properties of sutures, as I will soon begin the experimental component of my project!

Nurolon
To begin, there are so many different types of sutures!!!! Last week, I finally began the process of looking through which ones were available for testing at the office. There are so many boxes of them, with different sizes and properties. To give a brief overview, there are two main distinctions between sutures: absorbable vs. nonabsorbable, braided (multifilament) vs. non-braided (monofilament). Absorbable sutures refer to those made of materials which are broken down/absorbed by the tissue after a given period of time. Thus, absorbable sutures are advantageous for use in many of the internal tissues of the body, since no foreign material would be left inside the body once the sutures dissolve and there is no need for the patient to have them removed. Non-absorbable sutures, on the other hand, are permanent. More on sutures next week, but if you want to read more about them, click here.
Regular Silk


Regarding my experiment on sutures, last week I conducted a few trials (see here) The data is limited, as I simply tested out the function of the machine using a few already opened sutures, and my knot-tying skills are still far from perfect. However, in the weeks to come, I hope to run several more tests, and will continue to update this document.
V-loc

This week in particular, I ran into a significant challenge while testing the new V-loc sutures. I found out through my trail that the V-loc sutures are not only hard to tie (the tensile machine requires that the suture be secured around the two hooks), but are also a lot shorter than the other types of sutures. Most sutures are about 45 cm long; the V-loc ones are 15 cm. This, admittedly, is part of the V-loc’s design: it is a ‘barbed’ suture, which structure eliminates the need to tie knots. In terms of testing the tensile strength, though, the V-loc’s qualities make it difficult to experiment on.


Lastly, my journey in the OR continues: this week, I observed a Nissen fundoplication, an operation I first read about on Roshan’s blog from last year! It was a really cool procedure to see in person, especially standing right next to the operating table. It was, like the pyloromyotomy from last week, a laparoscopic procedure. To briefly explain the procedure, the surgery is designed to prevent or lessen gastric reflux (vomiting). To do this, the top portion of the stomach is wrapped around the esophagus and held together with a few sutures. This configuration allows the pressure in the stomach (after eating) to create a sort of valve in the lower esophagus.


After the stomach/esophagus looks like the picture above, a G(astrostomy)-tube was inserted through the abdomen. The entire surgery took about three hours and most of it consisted of clearing out the esophagus/stomach area. There was a lot of adipose tissue in the area, and the liver and spleen had to be moved out of the way. Lastly, the surgeons had to be very careful not the cut the vagus nerve, which controls parasympathetic functions such as heart rate and digestion.

In other news, this week the hospital was visited by Arizona Kettle Corn Company, and during break, everyone brought back small, brown paper bags of kettle corn. Their arrival seemed to considerably brighten everyone’s day, including mine.


This was a really exciting week for me! Hope all of you found the procedure to be as interesting as I did. I apologize for not being able to cover the abscess mentioned from last week—it will definitely be featured in my next post.

Best,

Vanessa

Friday, February 19, 2016

Week 2/ Opening Up

Last week, Dr. Truong and I met with a Covidien (now Medtronic) representative who kindly gave us a few boxes of v-loc sutures (3-0 silk, both 90 and 180) and a machine to test tensile strength (pictured below). This week, I will finally begin experimenting with this machine.


(Day 3) This device is what I will be using for tensile testing.

To explain a little more in depth about how this device works, the apparatus functions as the experimenter ties the suture string around the two hooks (using a square knot, for example). The machine is then ‘zeroed’, and we begin to twist the knob on the right, to pull that (right) hook away from the center. As the knob is twisted more and more, the amount of tension in the suture strings is measured (and displayed on the screen). Once the string snaps, the peak tensile strength can be retrieved by pressing the middle button. As I continue with my project, I will be relying heavily on this device to compare the strength of different sutures. After receiving the 2 boxes of V-loc sutures, I began experimenting on the tensile strength device and conducted several trials, using several different types of sutures already available at the office. More details (and some data) to come in the next post!


In terms of observing this week, on Tuesday I was able to watch 3 procedures! Dr. Truong was on call throughout the day and I was able to watch a couple of operations in the morning.


The first operation was to remove a renal mass. Dr. Vegunta and Dr. Truong had to remove a tumor growing around the kidney. The mass had had grown to be larger than the kidney—this may seem surprising, but since the patient was a newborn, the tumor (and kidney) were both very small. Still, this took about 2 hours as the arteries/veins surrounding the kidney had to be found and tied off.


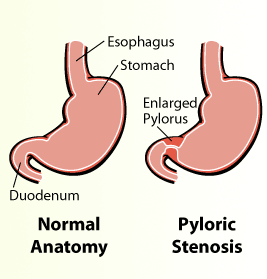
Next, I was able to observe a laparoscopic pyloromyotomy. This procedure is needed for patients with pyloric stenosis. Pyloric stenosis is a condition that usually occurs in newborns and involves the thickening of the pylorus muscle. This leads to a narrowing of the passage between the stomach and the small intestine.


Pyloric Stenosis. Image taken from UCSF Pediatric Surgery.


The condition causes vomiting and thus leads to loss of HCl (stomach acid) and dehydration. Because of this, patients must go through ‘fluid resuscitation’ (or replacement) before the operation itself and satisfy certain potassium, sodium, and chloride levels.


Three incisions were made to complete this laparoscopic procedure: one in the belly button, and two slightly higher, on both sides of the midriff area. A laparoscope (camera attached) was inserted through the belly button. With the camera’s video, they were able to locate the stomach, then the connection between the stomach and small intestine. (Find out more about laparoscopic procedures here.) Dr. Truong used a bovie (electrosurgical device) to mark where to cut, then pierced the muscle, using clamp to separate it.


What a bovie looks like.

The goal of the procedure is to cut the muscle so that what used to be an ‘O-shaped’ cross-section will now be ‘C-shaped’ (see picture below). This will allow for the passage of formula/breastmilk from the stomach into the rest of the digestive tract. This was the first laparoscopic procedure I’ve seen and definitely the most interesting operation I have observed so far. To read up more about pyloric stenosis, click here.

Enlarged pylorus, forming an 'O'-shape. Picture taken from Pediatric Surgeons of Phoenix.

In case you didn’t notice, that was only two procedures. The second operation I watched involved inserting a drain to remove fluid from an abscess, a process I will explain in my next blog post :^)


Have a great weekend!!


Vanessa

Friday, February 12, 2016

Week 1/ First Cut

Hello!

Today marks the end of my first week spent at my project site, Banner Health!


Tuesday was the first day I started work at Banner. As Dr. Truong had clinic, I got started on something that will be integral to the research component of my project—suture tying. Dr. Truong taught me to tie a ‘square knot’, and both the one-handed and two-handed methods. Although it may seem quite easy to do, each ‘square knot’ requires two separate ties to complete.  Which suture lies on top as well as which hand pulls in which direction matters greatly as well. If anyone is interested in learning how to tie a one-handed/two-handed square knot, click here.


(Day 1) Here I am, testing my skills on a suture tying kit! The knots tied on the left are mine, the knots on the right (which, as you can see, are 100000x better) are Dr. Truong’s (he kindly helped me even with his busy schedule during clinic).

On Wednesday, I finally obtained my observer’s badge (pictured below), and got to watch my first surgery in an operating room! The first one I watched was an inguinal hernia repair—something that I had actually heard of from taking Anatomy (thanks Mr. Nishan)—but during the procedure I was quite lost. Dr. Truong made a very small incision (less than 2 inches) in the groin area. For the next hour or so, the main task was to find and seal off the hernial sac, in which fluid had accumulated. When the procedure was done, another surgeon closed off with subcuticular sutures, using vicryl (a type of absorbable suture). Preventing scarring was very important, Dr. Truong said, as the incision area is all the parents would be able to see at the end of the procedure. At the very end, a syringe filled with lidocaine (a local anesthetic) and epinephrine (to reduce bleeding) was injected near the incision. A type of surgical glue (called Dermabond) was applied to the area; I was told this glue is chemically similar to the super glue we normally use—how strange is that??

Being in an OR was very different from what I had expected. Music played in the background, and though the surgeons were intent and focused on their work, the general atmosphere was quite relaxed.

My badge to enter the OR


(Day 2) On my second day at Banner, I was given the amazing opportunity of watching one of Dr. Truong's procedures right in the operating room. Here, I'm wearing the scrubs assigned to me to wear into the OR.

It’s only been a week since the start of my senior project, but I feel as if I have already learned so much. Can’t wait for the weeks to come!

All the best,

Vanessa