Monday, April 25, 2016

Conclusions

The last week of my senior project is here!  In terms of results, here are some graphs illustrating the results I collected from the tensile strength tests. I will be presenting my findings and talking about my internship experience in the beginning of May.


Thank you for following my blog for the past few weeks. I had a wonderful experience at Banner Health. Shout-out to my college counselor Ms. Mitrovich, my faculty advisor, Mr. Carey, and lastly, my on-site mentor, Dr. Truong, for all being awesome. And thanks for reading!


Cheers,

Vanessa

Saturday, April 16, 2016

Week 10/ Wrapping Up

This week, I went and bought new tissue for testing, and have been preparing the samples for testing next week. The segments will be stitched with different types of sutures—Stratafix, v-loc, and ‘regular’ vicryl. The pressure will again be measured by the arterial line setup and hopefully I will be able to compare the results to see if the suture type affects burst pressure for these samples. I have also spent a lot of this week researching at home, not only reading up about compartment syndrome, but also continuing to analyze my tensile strength data. Compartment syndrome really illustrates how capillary perfusion will fall due to high pressures in an area and points out to the fact that it is unlikely that vessels reach these abnormally high pressures. Thus, for my project, instead of measuring when the fluid will begin to leak from the tissue segments, I will be focusing on whether the stitches hold at certain ‘normal’ pressures that may exist in real conditions, and not just under simulated experimental/lab conditions.


In addition to my SRP project, I spent the second half of my week visiting Cornell. I was lucky enough to dorm with one of my old friends, and even got to sit in on several courses. The campus was beautiful (but huge, walking anywhere took around 10-15 minutes) and I had a really great time.

Cornell's bell tower
I have not yet committed to a school, but nonetheless it was an amazing experience to travel to Ithaca for the first time!

Hope everyone had a similarly great week! I will be conducting the rest of my trials soon, and can’t wait to share my results with you all. I have also been working on my presentation, to share my project with the greater community, that will occur on May 7th at the . My classmates and I will be presenting our findings from the past few months—feel free to come and take a look! (More information here).

Until next time,

Vanessa

Friday, April 8, 2016

Week 9/ Hiatus

Hi Everyonethis week I did not go to my SRP site, since I fell sick with a pretty bad cold. Work to be continued next week! See you soon~

Friday, April 1, 2016

Week 8/ Throwing a Stitch Pt. 2

Hi everyone & welcome back!

As my experiments with burst pressure continues, I have relocated to a new office near Cardon’s surgery wing, where the equipment is kept. A special shout-out to Ms. Berlin, who kindly agreed to let me run these experiments in her office, despite the smell/messiness! Having brought in the tissue samples and been shown how to do a purse string suture to attach the needle/catheter to the sample, an anesthesia tech kindly helped us set-up the arterial line and showed us how to calibrate the monitor. Here is what the set-up looks like:


The apparatus I used to test burst pressure is called an arterial line. To reiterate from previous blog posts, an A-line is usually used to monitor patients in intensive care, and measures intra-arterial blood pressure.


This must be calibrated before the beginning of each test, or ‘zero’ed so that the pressure is at zero. Then, to pump fluid through the catheter and into the tissue sample, the blue tag is pulled. Once the tissue inflates, the observer would watch for signs of leaking and then record the pressure immediately after fluid can be seen.

The IV/Flushing system is controlled, in short, by a 3-way stopcock.


In terms of preparing the tissue sample, I started out with segments about 8 cm in length, sutured close on both ends. We tried running tests on these (see tissue sample with green butterfly wings), but due to the limited amount of solution/time, decided against using such large samples. Afterwards, I cut the approximately 8 cm long segments in halves and sutured up the open ends. These smaller segments are what I will be running tests on in the future!


Above is a 4 cm long segment, with a butterfly catheter attached via purse string suture. The reason for the “butterfly wings” or side flaps around the needle are to anchor it to the tissue, in case pressure causes it to pop out.


The A-line offers a wealth of information, but for this experiment, I will only be looking at the pressure (pictured above in red).


A problem that I encountered this week came from the difficulty of determining exactly when the tissue sample started leaking. Once it begins to leak, the pressure stops increasing but fluctuates quickly. It was pretty difficult to get a precise measurement. In future testing, Dr. Truong suggested that I use food coloring so that the liquid that spills out will be easier to visualize. This, however, involves flooding the entire bag of saline solution (and even injecting the food coloring into the saline bag), which may be difficult to carry out and cause the saline bag to be unusable after my experiments.


These few hours that I spent working on testing burst pressure are some of the most interesting I have experienced in the project thus far!! It has been really exciting to be able to get the chance to use this equipment and even run tests with it.


Hope everyone has a great week!


Vanessa

Friday, March 25, 2016

Week 7/ Throwing a Stitch Pt. 1

Hey Everyone!


I have finally started to prep for my experiment on testing the difference in burst pressure on tissues sutured with V-loc, Stratafix, and regular sutures. For the methodology, I will be taking segments of pig uterus of approximately 5 cm in length, closing both ends with running sutures, and inserting a catheter in the mid-section of the segment to infuse/inflate the pipe-like structure with fluid. The pressure will be measured by the arterial line, which is connected to the catheter (see previous blog post for more details on the A-line).


I am planning to do 10-15 trials each per type of suture. Next week I will begin running tests, but as for this week, I will be preparing the segments to be tested.


To go in a bit more detail, a running stitch is one of the most basic stitches in surgery. It isn’t as pristine in appearance when compared to the other sutures (in which the suture can be hidden and only the knots can be seen on both ends). In the procedures I have seen thus far, the incisions have all been closed with the intention of minimizing damage to the skin’s appearance: in other words, so that sutures are not visible when looking at the wound. This is called a subcuticular suture.


To see how a running stitch is done as compared to a subcuticular suture, click on the highlighted links!


Pig Uterus! D’:


Working with pig uterus wasn’t as gross as I had expected, but the smell is slightly strong (especially since (as of now) I am working in the clinic’s Office). Hopefully by next week, there will be a room that I can use to run my experiments without the smell affecting everyone. If anyone is curious, pig uterus reminds me a lot of pig intestine (or rather, what I would imagine intestine to look like??) Dr. Truong even agreed with me—if the packaging had not labelled it as ‘Pig Uterus’, I’m not sure I would have known the difference.


This week when I met with Dr. Truong, I was allowed to enter the physician's dining hall, which is only open to physicians and studying med students! Eating here was super intimidating, especially as I sat next to so many doctors and professionals.


Before signing off, Happy Easter everyone! Here’s a great surgical video (warning: graphic content) to celebrate the weekend. See you guys next week!

Vanessa

Friday, March 18, 2016

Week 6/ Results

Hi Everyone!


It has been an incredible week, even without stepping into the OR once while at Banner. Over the past few days, I spent several hours completing the experimental part of my project—the portion concerning tensile strength, at least. I conducted tests that compared how tensile strength varied with the following features of sutures:


  1. Size. I used only what was available in the office, so to compare different sized sutures, I used 2-0, 3-0, and 5-0 Monocryl.
  2. Monofilament vs. Multifilament (braided). To compare these I used 4-0 Ethilon (monofilament) and 4-0 Nurolon (braided), both nylon sutures.
  3. Barbed vs. Regular. V-loc 180 (absorbable, barbed) and Coated Vicryl (regular, braided)


V-loc 180 Sutures!!!!!!!


To see a spreadsheet of my results, click here. In the beginning of next week I would also like to run some tests on the tensile strength of Stratafix sutures to compare to the results for the V-loc sutures. They are quite similar barbed sutures but provided by a different company, Ethicon. I will also begin to analyze the results gathered from the tensile strength tests. To do so, I will be finding a 95% confidence interval for each type of suture, and compare the different properties to see if there is a statistically significant difference (s/o to Mr. Peacher and our Stats class!)


Next week, I will be starting a new phase of my project. Using sutured tissue, I will be measuring the burst pressure of the tissue samples once they have been closed with either V-loc, Stratafix, or regular sutures. To summarize, burst pressure describes the maximum amount of pressure an inflated object (a pipe, usually) can withstand before the apparatus begins to leak/break/tear. To conduct this experiment, I will be using an arterial line to measure the pressure. It works, generally, like this:


The A-line will be borrowed from the ICU and the setup will be done by hospital tech, who have generously volunteered their time. Thank you so much! On another note, the tissue I will be using to test burst pressure is going to be pig uterus...Apparently this, along with the pig’s foot, can be obtained at your local asian market. Wish me luck :')

Hope that everyone has a great weekend! As colleges finally begin to release admissions decisions as well (!! D:), I hope that everyone receives good news!!!

Best,

Vanessa

Friday, March 11, 2016

Week 5/ Spring Break

This week was my ‘Spring Break’, but I still got a chance to visit the office on Friday. Dr. Truong got me a set of surgical tools (needle driver, scissors, and a pick-up) to begin practicing suturing!!

From my observations so far, suturing seems to require a lot of fine motor skills. You need to hold and wield the needle driver with precision and ease—something that can only be gained through hours of practice and hands-on experience.


Surgical scissors (bottom), needle driver/holder (middle), pick ups (top).

Today was my first day learning how to suture! I even brought a pig’s foot with me to practice on (sadly, we never got a chance to use it). So far, I’m pretty terrible. However, I did successfully learn how to tie an instrument’s tie! This tie is different from the knots I learned before in that it uses the needle driver as part of the process. It’s a lot easier than it looks and comes in handy in a procedure—in fact, most of the ties I have seen done in the OR are instrument ties.

Here’s a video that covers different types of suturing techniques, if you’re curious:

Anyways, despite my lack of a natural affinity for suturing, I’ve had an exciting day at Banner. Hopefully, with more practice throughout the next few weeks, I can learn the basics and be able to stitch up a cut, and even incorporate suturing into my project.
A day in spent in the office with my new suture kit :)
Holding a needle driver!!! (note: probably incorrectly)

Speaking with Dr. Truong and getting instructed on how to suture today really made me realize how amazing it is to be able to learn from a surgeon as a high school student with no medical training. I’m so grateful for the hands-on experience, and look forward to learning more in the remaining weeks.


Until next time,


Vanessa

Friday, March 4, 2016

Week 4/ Challenges


This week, I am experiencing a bit of a slump as I struggle to solidify an experiment for my project. A few challenges have come up in the last two weeks of trial testing, and I’m still working to find a way to resolve them. For example, the v-loc sutures I have been testing are difficult to secure around the hooks of the tensile strength machine. To give you guys a better idea, v-loc sutures look a bit like this up-close:


Because it is less flexible and designed to not require any knot tying (the barbs hold the suture in place), I have been struggling to wrap it around the hooks of the machine.  

These sutures are also significantly shorter than normal sutures. While typical sutures are around 45 cm (and thus, multiple trials can be run using one strand), v-loc sutures are only 15 cm in length. So, even if the v-loc suture can be successfully tied (or looped multiple times) around the hooks, there can only be one trial per strand. In the face of these problems, I may have to revise my experiment next week, and instead focus on the efficiency of each type of suture. However, I still plan to test the tensile strength of sutures. Instead of comparing v-loc and regular sutures, I might have to do a comparative analysis based on the size (1-0 vs. 3-0) and composition of suture (monofilament vs. multifilament).

Next, to cover the draining of the abscess that was mentioned in my previous posts:
An abscess is basically a collection of pus that has built up in the body. To drain it, doctors usually pack it with gauze for 1-2 days and simply wait. For larger/deeper abscesses, a draining tube is put in. In the operation I observed, Dr. Truong used a different method known as ‘Incision and Loop Drainage’. This procedure eliminates the need for packing and makes postoperative care easier.


In terms of observing surgeries, this week I watched the removal of a port. A chest port, or port-a-cath, is a device that is inserted in the body to eliminate the need to be stuck with a needle every time a patient requires IV treatment (for chemotherapy, fluid resuscitation, drawing blood, etc.) There are two parts to the device, the ‘port’ and the ‘catheter’. A catheter is a tube made of soft plastic. This is placed directly into the vein and leads to the port, a metal device that is placed under the patient’s skin. When treatment is needed, a special needle is poked to where the port is in order to access the vein. This device is especially useful for those with small or damaged veins. It was a quick, but really cool procedure! Find out more here.

That was about it for my week. See you next time!

Vanessa

Friday, February 26, 2016

Week 3/ Sutures

Hi Everyone,

In today’s post, I will start off by covering some basic properties of sutures, as I will soon begin the experimental component of my project!

Nurolon
To begin, there are so many different types of sutures!!!! Last week, I finally began the process of looking through which ones were available for testing at the office. There are so many boxes of them, with different sizes and properties. To give a brief overview, there are two main distinctions between sutures: absorbable vs. nonabsorbable, braided (multifilament) vs. non-braided (monofilament). Absorbable sutures refer to those made of materials which are broken down/absorbed by the tissue after a given period of time. Thus, absorbable sutures are advantageous for use in many of the internal tissues of the body, since no foreign material would be left inside the body once the sutures dissolve and there is no need for the patient to have them removed. Non-absorbable sutures, on the other hand, are permanent. More on sutures next week, but if you want to read more about them, click here.
Regular Silk


Regarding my experiment on sutures, last week I conducted a few trials (see here) The data is limited, as I simply tested out the function of the machine using a few already opened sutures, and my knot-tying skills are still far from perfect. However, in the weeks to come, I hope to run several more tests, and will continue to update this document.
V-loc

This week in particular, I ran into a significant challenge while testing the new V-loc sutures. I found out through my trail that the V-loc sutures are not only hard to tie (the tensile machine requires that the suture be secured around the two hooks), but are also a lot shorter than the other types of sutures. Most sutures are about 45 cm long; the V-loc ones are 15 cm. This, admittedly, is part of the V-loc’s design: it is a ‘barbed’ suture, which structure eliminates the need to tie knots. In terms of testing the tensile strength, though, the V-loc’s qualities make it difficult to experiment on.


Lastly, my journey in the OR continues: this week, I observed a Nissen fundoplication, an operation I first read about on Roshan’s blog from last year! It was a really cool procedure to see in person, especially standing right next to the operating table. It was, like the pyloromyotomy from last week, a laparoscopic procedure. To briefly explain the procedure, the surgery is designed to prevent or lessen gastric reflux (vomiting). To do this, the top portion of the stomach is wrapped around the esophagus and held together with a few sutures. This configuration allows the pressure in the stomach (after eating) to create a sort of valve in the lower esophagus.


After the stomach/esophagus looks like the picture above, a G(astrostomy)-tube was inserted through the abdomen. The entire surgery took about three hours and most of it consisted of clearing out the esophagus/stomach area. There was a lot of adipose tissue in the area, and the liver and spleen had to be moved out of the way. Lastly, the surgeons had to be very careful not the cut the vagus nerve, which controls parasympathetic functions such as heart rate and digestion.

In other news, this week the hospital was visited by Arizona Kettle Corn Company, and during break, everyone brought back small, brown paper bags of kettle corn. Their arrival seemed to considerably brighten everyone’s day, including mine.


This was a really exciting week for me! Hope all of you found the procedure to be as interesting as I did. I apologize for not being able to cover the abscess mentioned from last week—it will definitely be featured in my next post.

Best,

Vanessa

Friday, February 19, 2016

Week 2/ Opening Up

Last week, Dr. Truong and I met with a Covidien (now Medtronic) representative who kindly gave us a few boxes of v-loc sutures (3-0 silk, both 90 and 180) and a machine to test tensile strength (pictured below). This week, I will finally begin experimenting with this machine.


(Day 3) This device is what I will be using for tensile testing.

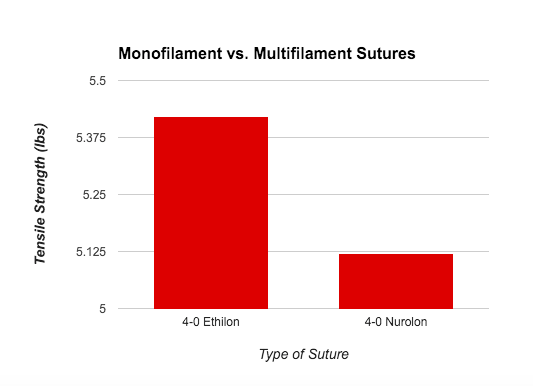
To explain a little more in depth about how this device works, the apparatus functions as the experimenter ties the suture string around the two hooks (using a square knot, for example). The machine is then ‘zeroed’, and we begin to twist the knob on the right, to pull that (right) hook away from the center. As the knob is twisted more and more, the amount of tension in the suture strings is measured (and displayed on the screen). Once the string snaps, the peak tensile strength can be retrieved by pressing the middle button. As I continue with my project, I will be relying heavily on this device to compare the strength of different sutures. After receiving the 2 boxes of V-loc sutures, I began experimenting on the tensile strength device and conducted several trials, using several different types of sutures already available at the office. More details (and some data) to come in the next post!


In terms of observing this week, on Tuesday I was able to watch 3 procedures! Dr. Truong was on call throughout the day and I was able to watch a couple of operations in the morning.


The first operation was to remove a renal mass. Dr. Vegunta and Dr. Truong had to remove a tumor growing around the kidney. The mass had had grown to be larger than the kidney—this may seem surprising, but since the patient was a newborn, the tumor (and kidney) were both very small. Still, this took about 2 hours as the arteries/veins surrounding the kidney had to be found and tied off.


Next, I was able to observe a laparoscopic pyloromyotomy. This procedure is needed for patients with pyloric stenosis. Pyloric stenosis is a condition that usually occurs in newborns and involves the thickening of the pylorus muscle. This leads to a narrowing of the passage between the stomach and the small intestine.


Pyloric Stenosis. Image taken from UCSF Pediatric Surgery.


The condition causes vomiting and thus leads to loss of HCl (stomach acid) and dehydration. Because of this, patients must go through ‘fluid resuscitation’ (or replacement) before the operation itself and satisfy certain potassium, sodium, and chloride levels.


Three incisions were made to complete this laparoscopic procedure: one in the belly button, and two slightly higher, on both sides of the midriff area. A laparoscope (camera attached) was inserted through the belly button. With the camera’s video, they were able to locate the stomach, then the connection between the stomach and small intestine. (Find out more about laparoscopic procedures here.) Dr. Truong used a bovie (electrosurgical device) to mark where to cut, then pierced the muscle, using clamp to separate it.


What a bovie looks like.

The goal of the procedure is to cut the muscle so that what used to be an ‘O-shaped’ cross-section will now be ‘C-shaped’ (see picture below). This will allow for the passage of formula/breastmilk from the stomach into the rest of the digestive tract. This was the first laparoscopic procedure I’ve seen and definitely the most interesting operation I have observed so far. To read up more about pyloric stenosis, click here.

Enlarged pylorus, forming an 'O'-shape. Picture taken from Pediatric Surgeons of Phoenix.

In case you didn’t notice, that was only two procedures. The second operation I watched involved inserting a drain to remove fluid from an abscess, a process I will explain in my next blog post :^)


Have a great weekend!!


Vanessa

Friday, February 12, 2016

Week 1/ First Cut

Hello!

Today marks the end of my first week spent at my project site, Banner Health!


Tuesday was the first day I started work at Banner. As Dr. Truong had clinic, I got started on something that will be integral to the research component of my project—suture tying. Dr. Truong taught me to tie a ‘square knot’, and both the one-handed and two-handed methods. Although it may seem quite easy to do, each ‘square knot’ requires two separate ties to complete.  Which suture lies on top as well as which hand pulls in which direction matters greatly as well. If anyone is interested in learning how to tie a one-handed/two-handed square knot, click here.


(Day 1) Here I am, testing my skills on a suture tying kit! The knots tied on the left are mine, the knots on the right (which, as you can see, are 100000x better) are Dr. Truong’s (he kindly helped me even with his busy schedule during clinic).

On Wednesday, I finally obtained my observer’s badge (pictured below), and got to watch my first surgery in an operating room! The first one I watched was an inguinal hernia repair—something that I had actually heard of from taking Anatomy (thanks Mr. Nishan)—but during the procedure I was quite lost. Dr. Truong made a very small incision (less than 2 inches) in the groin area. For the next hour or so, the main task was to find and seal off the hernial sac, in which fluid had accumulated. When the procedure was done, another surgeon closed off with subcuticular sutures, using vicryl (a type of absorbable suture). Preventing scarring was very important, Dr. Truong said, as the incision area is all the parents would be able to see at the end of the procedure. At the very end, a syringe filled with lidocaine (a local anesthetic) and epinephrine (to reduce bleeding) was injected near the incision. A type of surgical glue (called Dermabond) was applied to the area; I was told this glue is chemically similar to the super glue we normally use—how strange is that??

Being in an OR was very different from what I had expected. Music played in the background, and though the surgeons were intent and focused on their work, the general atmosphere was quite relaxed.

My badge to enter the OR


(Day 2) On my second day at Banner, I was given the amazing opportunity of watching one of Dr. Truong's procedures right in the operating room. Here, I'm wearing the scrubs assigned to me to wear into the OR.

It’s only been a week since the start of my senior project, but I feel as if I have already learned so much. Can’t wait for the weeks to come!

All the best,

Vanessa